Kubernetes Architecture
Source:
https://www.educative.io/courses/kubernetes-in-practice- Load Balance
- Configuration
- Secrets
- Schedule Tasks
A Kubernetes Cluster
Introduction to Kubernetes cluster

The workers
每個 worker node 上面可以有多個 container app
The master
Mater node 主要是負責管理這個 cluster 用的,負責執行 Kubernetes API 管理 cluster 的任務
當我們透過 kubectl 去 apply manifest file (yaml file),則 Master Node,就會將我們想要的狀態完成,它會去比對現在Cluster的狀態,然後作對應的調整。
Kubectl
kubectl 是 Kubernetes CLI 的工具,是用來溝通 Kubernetes cluster 的介面。這工具有兩種用法:
- Declarative way 用 mainifest 來定義想要什麼,讓 master 來管理並達成。
- Imperative way 則是我們直接指定應該用什麼順序來執行。
Pods
Introduction to pods
Pod 是 Kubernetes 中處理 schedule 時的最基本的 atomic 的單位。每一個 Pod 可以有多個 containers
Pods are the atomic unit of scheduling
Pod 是處理 schedule 的 atomic unit 的意思是指,當我們想要 scale 我們的 application 時,我們並不是在一個 pod 裡面生出很多的 container。而是建立多個 Pods 每個 pod 裡面都有一個 container 執行著一個 application。
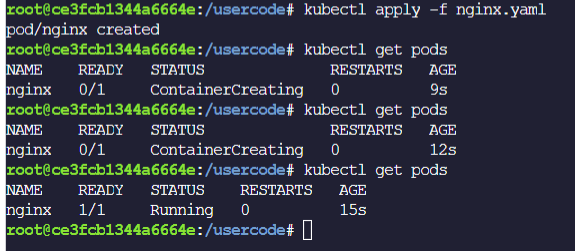
下面是一個 manifest 的 nginx.yaml範例,定義了一個 Pod 叫做 nginx,裡面有一個 container 叫做 nginx-container。
當我們執行
kubectl apply -f nginx.yaml 指令後,在執行
kubectl get pods 我們可以看到一個叫做 nginx 的 pod 跑起來了,狀態是 Running 情形。
Different between pods and containers
實際上,一個 pod 裡面可以有多個 containers,在大型系統裡面一個 pod 可能會是一個商業邏輯的應用服務,裡面可能同時包含了不同的containers來達到這個商業邏輯提供的服務。
Playing with Running Pods
- Streaming logs
- Executing commands
- Killing pods
Streaming logs
執行 apply 以及 port-forward 後,已經啟動 nginx 並且 mapping 到 host 的 port 80
kubectl apply -f nginx.yaml
nohup kubectl port-forward --address 0.0.0.0 nginx 3001:80 > /dev/null 2>&1 &
如果要檢視 nginx 的 access logs 可以用以下的指令
kubectl logs --follow nginx
請參考以下範例
root@5c57b40d9e8f850e:/usercode# nohup kubectl port-forward --address 0.0.0.0 nginx 3001:80 > /dev/null 2>&1 &
[1] 6293
root@5c57b40d9e8f850e:/usercode# kubectl logs --follow nginx
/docker-entrypoint.sh: /docker-entrypoint.d/ is not empty, will attempt to perform configuration
/docker-entrypoint.sh: Looking for shell scripts in /docker-entrypoint.d/
/docker-entrypoint.sh: Launching /docker-entrypoint.d/10-listen-on-ipv6-by-default.sh
10-listen-on-ipv6-by-default.sh: info: Getting the checksum of /etc/nginx/conf.d/default.conf
10-listen-on-ipv6-by-default.sh: info: Enabled listen on IPv6 in /etc/nginx/conf.d/default.conf
/docker-entrypoint.sh: Launching /docker-entrypoint.d/20-envsubst-on-templates.sh
/docker-entrypoint.sh: Launching /docker-entrypoint.d/30-tune-worker-processes.sh
/docker-entrypoint.sh: Configuration complete; ready for start up
2022/07/03 02:22:00 [notice] 1#1: using the "epoll" event method
2022/07/03 02:22:00 [notice] 1#1: nginx/1.23.0
2022/07/03 02:22:00 [notice] 1#1: built by gcc 10.2.1 20210110 (Debian 10.2.1-6)
2022/07/03 02:22:00 [notice] 1#1: OS: Linux 4.19.197
2022/07/03 02:22:00 [notice] 1#1: getrlimit(RLIMIT_NOFILE): 1048576:1048576
2022/07/03 02:22:00 [notice] 1#1: start worker processes
2022/07/03 02:22:00 [notice] 1#1: start worker process 32
2022/07/03 02:22:00 [notice] 1#1: start worker process 33
127.0.0.1 - - [03/Jul/2022:02:22:56 +0000] "GET / HTTP/1.1" 200 615 "-" "Mozilla/5.0 (Windows NT 10.0; Win64; x64) AppleWebKit/537.36 (KHTML, like Gecko) Chrome/103.0.0.0 Safari/537.36" "-"
Executing commands
如果想要在指定的 pod 上單純執行指令,請參考以下的範例,在指定的 pod nginx 上執行 ls 指令
如果想要在指定的 pod 上執行互動的指令,請參考以下的範例,在指定的 pod nginx 上執行 -it 的參數去bash 指令
kubectl exec -it nginx -- bash
Killing pods
以下兩種都是刪除 pods 的方式
kubectl delete -f nginx.yaml
Deployments
Defining Our Deployment Manifest
以下是一個 deployment.yaml 的簡單範例
apiVersion: apps/v1
kind: Deployment
metadata:
name: hellok8s
spec:
replicas: 1
selector:
matchLabels:
app: hellok8s
template:
metadata:
labels:
app: hellok8s
spec:
containers:
- image: brianstorti/hellok8s:v1
name: hellok8s-container
解釋說明
- kind - 告訴 Kubernetes 這是一個 Deployment 的 object
- metadata.name - 只需要定義一個有意義的名字來表示這個 Deployment
- spec - 這個 section 主要是定義這個 Deployment 要做什麼事情
- selector 裡面的 matchLabels 定義了這個 Deployment 將會管理那些 label為 app 的值為 hellok8s 的 pods。
- template 則是用來定義,哪些 pods 會跑什麼 docker image。
Apply 並檢視 Deployments 和 Pods 的狀態
kubectl apply -f deployment.yaml
# deployment.apps/hellok8s created
kubectl get deployments
# NAME DESIRED CURRENT UP-TO-DATE AVAILABLE
# hellok8s 1 1 1 1
kubectl get pods
# NAME READY STATUS RESTARTS
# hellok8s-6678f66cb8-42jtr 1/1 Running 0
請注意這邊的 NAME 所顯示的 hellok8s-6678f66cb8-42jtr這個名稱是會改變的。
Restarting Failed Pods
Kubernetes is always trying to ensure our desired state matches our current state.
當我們試著透過指令 kubectl delete pod 強制將某個 pod 刪除,則 Kubernetes 會立刻重起一個 pod 來保持當時這個 Deployment.yaml 所要求的狀態 replicas: 1 。請參考以下範例:
kubectl apply -f deployment.yaml
kubectl get pods
# NAME READY STATUS RESTARTS
# hellok8s-6678f66cb8-42jtr 1/1 Running 0
# Replace the pod name with your local pod name
kubectl delete pod hellok8s-6678f66cb8-42jtr
# pod "hellok8s-6678f66cb8-42jtr" deleted
kubectl get pods
# NAME READY STATUS RESTARTS
# hellok8s-6678f66cb8-8nqf2 1/1 Running 0
Scaling Up/Down Our Application
Scaling Up Our Application
前面的 Deployment.yaml 中有一個定義在 spec 的 section 叫做 replicas 可以用來控制我們如何 Scaling Up / Down 我們的 pods 的數量。請參考下面這個範例 scaleup.yaml:
apiVersion: apps/v1
kind: Deployment
metadata:
name: hellok8s
spec:
replicas: 10
selector:
matchLabels:
app: hellok8s
template:
metadata:
labels:
app: hellok8s
spec:
containers:
- image: brianstorti/hellok8s:v1
name: hellok8s-container
當我們執行以下的指令時,它將會產生10個新的pods。
kubectl apply -f scaleup.yaml
這邊要特別說明,在真正的 production 環境時,實際上可能會有多個 worker nodes 在我們的 cluster 之中,而 Kubernetes 會將這些 pods 配置在多個不同的 nodes 上,所以即使其中一個 node 失敗,它仍就會在其他的 nodes 上把 pods 生出來確保 application 能夠正常的 Scaling Up。
Scaling Down Our Application
下面是一個 scaledown.yaml 的範例,將 replicas 改為 2。
apiVersion: apps/v1
kind: Deployment
metadata:
name: hellok8s
spec:
replicas: 2
selector:
matchLabels:
app: hellok8s
template:
metadata:
labels:
app: hellok8s
spec:
containers:
- image: brianstorti/hellok8s:v1
name: hellok8s-container
當我們再次執行以下指令時,Kubernetes,將會把其他的 pods 刪除,只留下2個 pods
kubectl apply -f scaledown.yaml
kubectl get pods
# NAME READY STATUS
# hellok8s-6678f66cb8-8nqf2 1/1 Running
# hellok8s-6678f66cb8-cmb4j 1/1 Running
# hellok8s-6678f66cb8-6r7fb 1/1 Terminating
# hellok8s-6678f66cb8-7bg4s 1/1 Terminating
# hellok8s-6678f66cb8-96xh5 1/1 Terminating
# hellok8s-6678f66cb8-h5tg4 1/1 Terminating
# hellok8s-6678f66cb8-j2b5n 1/1 Terminating
# hellok8s-6678f66cb8-l5hzw 1/1 Terminating
# hellok8s-6678f66cb8-r9bzd 1/1 Terminating
# hellok8s-6678f66cb8-wl4bb 1/1 Terminating
Rolling Out Releases
Releasing new versions
假設我們已經有一個新的版本的 docker image 叫做 hellok8s:v2 的版本。那我們想要更新現在的pods 變成新版的,只需要去修改原本的 Deployment.yaml 的 spec 區塊中 image 的值如下:
apiVersion: apps/v1
kind: Deployment
metadata:
name: hellok8s
spec:
replicas: 2
selector:
matchLabels:
app: hellok8s
template:
metadata:
labels:
app: hellok8s
spec:
containers:
- image: brianstorti/hellok8s:v2
name: hellok8s-container
接著我們如下指令,重新 apply 即可。
kubectl apply -f deployment.yaml
我們可以透過兩種指令來觀察 pods 的實際上的變化,第二種要安裝 watch 工具
- kubectl get pods --watch
- watch kubectl get pods
Rolling Update
整個 rolling update 的過程如下圖所示,在沒有設定RollingUpdate的策略時,實際上是先產生新版本的 pod 然後,刪除一個舊版本的pod ,它會持續將指定的 pod 數量生出來為止。
Controlling the Rollout Rate
當我們有超過100個pods要進行更新時候,我們需要設定參數讓整個rollout速度加快。其中一種strategy 叫做 rollingUpdate 可以用來設定這種需求。
maxSurge and maxUnavailable
- maxSurge 用來指定最多可以超過指定的 replicas 多少個 pods。
- maxUnavailable 用來指定最多只能個低於指定的 replicas 多少個 pods。
以下面這個範例來看,假設 replicas 指定的值是3,而maxSurge和maxUnavailable 分別都指定1。這時候在 rollout 過程中會保證我們最少有2個pods存在( replicas - maxUnavailable ),最多有4個pods存在 (replicas + maxSurge)。
apiVersion: apps/v1
kind: Deployment
metadata:
name: hellok8s
spec:
strategy:
rollingUpdate:
maxSurge: 1
maxUnavailable: 1
replicas: 3
selector:
matchLabels:
app: hellok8s
template:
metadata:
labels:
app: hellok8s
spec:
containers:
- image: brianstorti/hellok8s:v2
name: hellok8s-container
maxSurge 和 maxUnavailable 可以直接指定數字或是百分比% 來設定,在預設的情況下,這兩個參數的預設值是 25%。
以下這張圖就是整個 rollout 過程中v1和v2 版本整個 rollout 的過程,由左到右完成。
Using a Different Rollout Strategy
Using Recreate
前面一種rollingUpdate的strategry是採用並行的方式進行更新v1到v2的版本,但如果我們有需求是要一次性的確保在production環境上只有一個版本運作時,我們可以採用另一種strategy叫做 Recreate,請參考以下的範例:
apiVersion: apps/v1
kind: Deployment
metadata:
name: hellok8s2
spec:
strategy:
type: Recreate
replicas: 3
selector:
matchLabels:
app: hellok8s
template:
metadata:
labels:
app: hellok8s
spec:
containers:
- image: brianstorti/hellok8s:v2
name: hellok8s-container
這種strategy會有 downtime的問題存在,它整個 deployment的過程如下所示:
Dealing with Bad Releases
在整個 release deployment 過程當中難免會遇到,新 release 版本不如預期,可能無法正確運行。
Kubetnets 提供了兩種能夠讓我們中止 rollout 的方式。一種是直接透過指令去中止並且重新將舊版本的 pods 建回來,一種是透過設定檢驗新的 pods是否如預期的行為,再決定是否繼續將整個 rollout deployment 完成。
Manually blocking the bad release
當我們執行以下的 deployment 指令,它在 deployment 過程中開始 rollout update。
kubectl apply -f deployment.yaml
一旦我們發現有問題,我們可以手動的執行以下的指令。(hellok8s是在deployment.yaml的metadata中定義的名稱)
kubectl rollout undo deployment hellok8s
Automatically blocking the bad release
另一種方式,是透過設定兩種探測方式(readinessProbe和livenessProbe),來檢查新版本的 pod 是否如預期的行為,在決定是否繼續 rollout 。請參考以下使用readinessProbe的範例:
apiVersion: apps/v1
kind: Deployment
metadata:
name: hellok8s
spec:
replicas: 2
selector:
matchLabels:
app: hellok8s
template:
metadata:
labels:
app: hellok8s
spec:
containers:
- image: brianstorti/hellok8s:v2 # Still using v2
name: hellok8s-container
readinessProbe: # New readiness probe
periodSeconds: 1
successThreshold: 5
httpGet:
path: /
port: 4567
它定義了每一秒都會送一個 GET 到指定的port 4567 的URL path: / 的位置,並且成功5次。這個新的 pod 才會被認定是運作正常的,它才會開始繼續往下去 update 新的 pod 。整個過程如下所示:
Keeping Applications Healthy with Liveness Probes
livenessProbe 和 readinessProbe
前面提到在整個 rollout deployment 過程當中,我們可以透過指定測試某些API是否運作正常來決定 pod 是否如預期的行為,再繼續完成整個 deployment 的過程。一些比較特殊的情況是 pod 可能運行一段時間後,就會無法處理 request,這時候需要讓 Kubernets 重啟這些 pod。我們就可以用另一種 probe 方式叫做 livenessProbe,請參考如下的範例:
apiVersion: apps/v1
kind: Deployment
metadata:
name: hellok8s
spec:
replicas: 2
selector:
matchLabels:
app: hellok8s
template:
metadata:
labels:
app: hellok8s
spec:
containers:
- image: brianstorti/hellok8s:v2
name: hellok8s-container
readinessProbe:
periodSeconds: 1
successThreshold: 5
httpGet:
path: /
port: 4567
livenessProbe:
httpGet:
path: /
port: 4567
這個做法實際上,就是每隔一段時間 Kubernetes 會呼叫這個指定的位置,看是否能夠呼叫成功。預設的時間是每10秒一次,如果呼叫失敗它就會重啟這個 pod。
另一種,我們也可以自訂 script 來驗證這個 pod 是否運行正常,請參考以下使用exec.command的範例:
apiVersion: apps/v1
kind: Deployment
metadata:
name: hellok8s
spec:
replicas: 2
selector:
matchLabels:
app: hellok8s
template:
metadata:
labels:
app: hellok8s
spec:
containers:
- image: brianstorti/hellok8s:v2
name: hellok8s-container
readinessProbe:
periodSeconds: 1
successThreshold: 5
httpGet:
path: /
port: 4567
livenessProbe:
exec:
command:
- check_health.sh
這個 check_health.sh 執行結束回傳 0 表示成功。
Services
Service 是 Kubernetes 的另一種 resource,用來提供一個存取 pods 的可信賴的端點。它的概念如下圖所示:
A Quick Example
下面是一個 service.yaml 簡單的範例:
apiVersion: v1
kind: Service
metadata:
name: hellok8s-svc
spec:
type: NodePort
selector:
app: hellok8s
ports:
- port: 4567
nodePort: 30001
當我們執行以下的指令:
kubectl apply -f service.yaml
Kubernetes 將會建立如下圖的關係,使用者可以透過存取Port 30001,而這個會自動做 port-foward 到 match 的 label 為 app 值是 hellok8s 的 application。
我們可以利用下面的指令來檢視 service 的狀態
kubectl get service hellok8s-svc
# NAME TYPE CLUSTER-IP PORT(S)
# hellok8s-svc NodePort 10.102.141.32 4567:30001
Service Types and ClusterIP
Service Types
前面用過 NodePort 的 Service, 它是直接開一個 Port 30001 在全部的 worker nodes 上,然後將這個 30001 的 request 導向指定 pods 的 port 4567去處理這個 request。當我們在撰寫 manifest 使用 service 時,如果沒有特別指定 spec.type 為 NodePort 的話,那預設就是 ClusterIP。
ClusterIP
當我們需要在 cluster 內部,讓另一個 pod-b,來存取 pod-a的時候,我們會建立一個 service-a 的 spec.type指定為 ClusterIP 的 type,如以下的 nginx.yaml 範例:
apiVersion: v1
kind: Service
metadata:
name: clusterip-svc
spec:
type: ClusterIP # optional
selector:
app: nginx
ports:
- port: 80
targetPort: 80
---
apiVersion: v1
kind: Pod
metadata:
name: nginx
labels:
app: nginx
spec:
containers:
- name: nginx-container
image: nginx
當我們 Apply 這個 nginx.yaml 之後,它將會建立一個
# Apply these files
kubectl apply -f deployment.yaml
kubectl apply -f nginx.yaml
kubectl get service
# NAME TYPE CLUSTER-IP
# clusterip-svc ClusterIP 10.105.223.250
這時候,這個 clusterip-svc的服務所提供的 IP 10.105.223.250 只能夠在這個 cluster 內部被存取。
所以當我們進入到原本的 hellok8s 其中一個 pod 時,我們可以直接去存取這個 IP 10.105.223.250。請參考以下範例:
# Replace the pod name to what you have running locally
kubectl exec -it hellok8s-6696859cbd-gmhcp -- sh
# Replace the service ip to what you have running locally
# We are now inside the hellok8s container
curl http://10.105.223.250:80
# nginx welcome page
NodePort and LoadBalancer
NodePort
NodePort 的運作方式,實際上是在每個 Worker Node上都開啟一個Port 30001。這個Port 30001是外部可以直接存取的,以下面這張圖為例子。
外部是可以透過
http://node1-ip:30001 或 http://node2-ip:30001 直接存取的
LoadBalancer
LoadBalancer 實際上是 NodePort 和 ClusterIP 所擴展的一種 Service Type。它直接提供了外部一個存取的端點,透過它將會自動地把 request 送到對應的 pods 去。如下面這張圖所示:
ExternalName
另一種 Service Type 叫做 ExternalName,這是一種用來定義給Cluster內部的 pods 去存取外部資源的端點位置,請參考下面這個 database.yaml 範例。
apiVersion: v1
kind: Service
metadata:
name: db
spec:
type: ExternalName
externalName: my-db.company.com
這些 pods 只需要透過名稱 my-db.company.com 去存取外部的 database。而 dateabase.yaml 實際上就是建立一個 db service,提供了一個外部的名稱讓內部的 pods 能夠存取,而不需要知道它實際上的位置在哪裡。
Service Discovery
前面實際上,我們提過用 ClusterIP 這種 service type 來提供給 app-a 去存取 app-b 是透過 service-b 這種方式來存取。我們可以不用 hard-code 這個 app-b 的 IP。因此,無論 app-b 是否重新被建立,這個 app-a 都能夠用這個 ClusterIP來存取。但是,ClusterIP 實際上也是會改變的,當我們刪除這個 service-b ,再重新建立 service-b 時,它所綁定的 ClusterIP 也會改變。因此我們需要 Service Discovery 的功能。
Kubernetes 提供兩種不同的 Service Discovery 的方式:
- DNS
- Injected environment variables
DNS
Environment Variables
Ingress
Configuring Applications with Configmaps
Using Secrets for Sensitive Configs
Running Jobs
Organizing Resources with Namespaces
Managing Containers Resource Usage
Understanding the Kubeconfig File