Docker 架構
About Docker client
Docker client 實際上就是我們安裝好 Docker 後,提供給我們使用的 CLI command。他主要是負責透過Restful API 去呼叫 Docker daemon 來完成所需要的操作。
About Docker daemon
實際上是一個 dockerd 的服務程序,提供 Restful API (over gRPC) 給 Docker client進行操作,用來管理 Docker objects,包含 images, containers, networks 和 volumes。它也能夠用來和別的 Docker daemon 進行溝通來管理其他的 Docker services。
About containerd
containerd (docker-containerd)是一個 high-level 的 runtime 用來管理 container的整個生命週期。此外,還有一些額外的功能包含 下載(pulling) images, 建立 network interface,以及管理 low-level 的 runc的 instances。在啟動一個新的 container 的過程當中,containerd 並不是直接自己啟動一個新的 container。實際上,它是將需要的 Docker image 轉換成 OCI bundle,並且透過 runc 來使用這個 OCI bundle 來建立一個新的 container。當 container 這個 sub-process 啟動後,runc 就會離開。而 shim 會變成這個 container sub-process 的 parent process。
About shim
shim 是 container 的 parent process 用來負責維持 STDIN 和 STDOUT 的pipes是open的狀態, 因此當 Docker daemon 重啟時並不會造成 container 因為 pipes 被 close 後而被終止的情形。另外,shim 會負責回報目前 container的狀態給 Docker daemon。
About runc
TBD
Implementation on Linux
dockerd(the Docker daemon)docker-containerd(containerd)docker-containerd-shim(shim)docker-runc(runc)
Containerd - https://github.com/containerd/containerd/releases
Docker images
用來存放 docker image 的位置,最常見的 registry 在 https://hub.docker.com/
可以用 docker info 指令來檢視 Registry: 所指定的位置
shell> docker info
Image Registries 可以有 1 個或個 多個 image repositories,而每個 repositories 可以有多個 images
Image Naming and Tagging
docker image pull <repository>:<tag>
以下指令是 從 top-level 的 repository 上面下載 tag 為 latest的 image
docker image pull alpine:latestdocker image pull redis:latest請注意 tag 為 latest 並不代表一定就是最新的版本,具體要看那個 image 官方網站的版本
以下指令是 從 top-level 的 repository 的 namespace=tu-deom上面下載 tag 為 v2 的 image
docker image pull nigelpulton/tu-deom:v2
以下指令是透過 -a 參數,去指定下載全部的 tags 版本
docker image pull -a <repository>:<tag>
實際上 tag 只是一個任意的字串,具體的版號比對還是要看 IMAGE-ID
Images and Layers
在執行 docker image pull 時,會從 Layer-1 開始下載
shell> docker image inspect ubuntu:latest
[
{
"Id": "sha256:bd3d4369ae.......fa2645f5699037d7d8c6b415a10",
"RepoTags": [
"ubuntu:latest"
<Snip>
"RootFS": {
"Type": "layers",
"Layers": [
"sha256:c8a75145fc...894129005e461a43875a094b93412",
"sha256:c6f2b330b6...7214ed6aac305dd03f70b95cdc610",
"sha256:055757a193...3a9565d78962c7f368d5ac5984998",
"sha256:4837348061...12695f548406ea77feb5074e195e3",
"sha256:0cad5e07ba...4bae4cfc66b376265e16c32a0aae9"
]
}
}
]
Pulling Images by Digest
由於 git tag 是可以修改的,或是說可以被 overwrite。因此,為了確保在做 pull image 時候確保下載的 docker image 是原本所預期的版本,我們可以透過以下指令來顯示該 image 的 DIGEST
shell> docker image ls --digests alpine
REPOSITORY TAG DIGEST IMAGE ID CREATED SIZE
alpine latest sha256:686d8c9dfa6f3ccfc8230bc3178d23f84eeaf7e457f36f271ab1acc53015037c e66264b98777 4 weeks ago 5.53MB
然後,利用以下命令來指定digest 做 docker image pull
shell> docker image pull alpine@sha256:686d8c9dfa6f3ccfc8230bc3178d23f84eeaf7e457f36f271ab1acc53015037c
Multi-Architecture Images
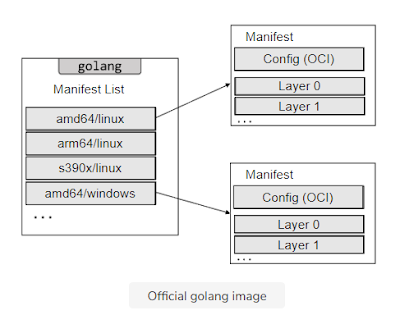
Docker image 透過以下的結構來支援在單一個 docker image 同時支援不同平台架構(Linux on x64, Linux on PowerPC, Windows x64, Linux on different versions of ARM)
docker container run 時候,會先查找 Manifest List 中是否有對應支援的平台的 Manifest,如果有會先取得這個對應的 Manifest 然後才
{
"schemaVersion": 2,
"mediaType": "application/vnd.docker.distribution.manifest.list.v2+json",
"manifests": [
{
"mediaType": "application/vnd.docker.distribution.manifest.v2+json",
"size": 1796,
"digest": "sha256:ea66badd7cf7b734e2484a1905b6545bd944ef3bdeea18be833db3e2219f1153",
"platform": {
"architecture": "amd64",
"os": "linux"
}
},
{
"mediaType": "application/vnd.docker.distribution.manifest.v2+json",
"size": 1796,
"digest": "sha256:d1faaf4c45064097d13d604c93724fa2b57f76223e31dc20091ee6aec5df65c6",
"platform": {
"architecture": "arm",
"os": "linux",
"variant": "v5"
}
},
{
"mediaType": "application/vnd.docker.distribution.manifest.v2+json",
"size": 1796,
"digest": "sha256:2f6a38bfc8e43016a5f79d4d376e09bfd829566b20a40898798ba6a10b143269",
"platform": {
"architecture": "arm",
"os": "linux",
"variant": "v7"
}
},
{
"mediaType": "application/vnd.docker.distribution.manifest.v2+json",
"size": 1796,
"digest": "sha256:47b9c8aa3f8b415aeca87a1e13353a611df4cf64a07e38f14b1bc9679d56a3b8",
"platform": {
"architecture": "arm64",
"os": "linux",
"variant": "v8"
}
},
{
"mediaType": "application/vnd.docker.distribution.manifest.v2+json",
"size": 1796,
"digest": "sha256:08c3c6149e409134d1773f215c8f207866605c1bec4bf6763175b5cc22eafb53",
"platform": {
"architecture": "386",
"os": "linux"
}
},
{
"mediaType": "application/vnd.docker.distribution.manifest.v2+json",
"size": 1796,
"digest": "sha256:9b853afe0ce8062bb0a1ca8babb72c0d5773bd14788f4471e2c9a7654745f01e",
"platform": {
"architecture": "mips64le",
"os": "linux"
}
},
{
"mediaType": "application/vnd.docker.distribution.manifest.v2+json",
"size": 1796,
"digest": "sha256:726e75aa04bb7ed012e7bf9984b0a1fe25e1e0316e0f9245cc68b2bd0af5112c",
"platform": {
"architecture": "ppc64le",
"os": "linux"
}
},
{
"mediaType": "application/vnd.docker.distribution.manifest.v2+json",
"size": 1796,
"digest": "sha256:9b1f50237df09f109696a52b6206d2d00692295bf675b649f8ed4fd6a9bcf31c",
"platform": {
"architecture": "s390x",
"os": "linux"
}
},
{
"mediaType": "application/vnd.docker.distribution.manifest.v2+json",
"size": 3401,
"digest": "sha256:cf9ffc87c29e1f1e72a74e714e58f00e55eed4c0acecf7fa5ea148cd46d8a5b2",
"platform": {
"architecture": "amd64",
"os": "windows",
"os.version": "10.0.20348.768"
}
},
{
"mediaType": "application/vnd.docker.distribution.manifest.v2+json",
"size": 3401,
"digest": "sha256:cbe8f5856e85ad134eec9e778abb3f4b50926e4a935afae9cace36adc3e6b58b",
"platform": {
"architecture": "amd64",
"os": "windows",
"os.version": "10.0.17763.3046"
}
}
]
}
How to build image support multi-arch
export DOCKER_CLI_EXPERIMENTAL=enabled
docker buildx build --push --platform linux/arm/v7,linux/arm64/v8,linux/amd64 --tag your-username/multiarch-example:buildx-latest .
另一種方式去啟用 buildx 工具是去修改 config.json 如下
{
"experimental": true
}
Reference:
Containers
一個 Image 可以用來建立多個 Containers 來執行。Containers 就是 Image 的一個 instance。
當執行這樣的指令時
shell> docker container run -it ubuntu:latest /bin/bash
實際上會做下面的事情:
- docker client 會將 command 的參數轉換後,呼叫 docker daemon 上面所提供的 API server (over gRPC)
- docker daemon 會接收到 command 的內容,並且查找 Docker host 的 local image repository是否有指定的 image
- 如果沒有,docker daemon 會去找 Docker Hub,如果有找到就會下載這個 image 存到 local image repository
- docker daemon 透過 containerd 和 runc 來用這個指定的 image 建立 container 並啟動
Stopping Containers Gracefully
應該要使用 docker container stop 來關閉 container,因為它會送出一個 SIGTERM 的訊號給正在執行的 main process。如果 main process 在10秒內沒有自己關閉,它將會收到一個 SIGKILL的訊號。
Self-Healing Containers with Restart Policies
alwaysunless-stoppedon-failed
shell> docker container run --name neversaydie -it --restart always alpine sh
shell> docker container run --name neversaydie -it --restart unless-stopped alpine sh
shell> docker container run --name neversaydie -it --restart on-failed alpine sh
unless-stopped
如果該 container 的狀態是 stopped 時,當重啟 docker daemon 時候,並不會自動啟動該 container
on-failure
這個 container 如果是因為收到 non-zero exit code 而離開時,它會自動被重啟
Containerizing an Application
- Start with your application code and dependencies.
- Create a Dockerfile that describes your app, its dependencies, and how to run it.
- Feed the Dockerfile into the
docker image buildcommand. - Push the new image to a registry (optional).
Docker login
Docker tag <image_name> <your_docker_hub_username>/<image>:<version>
Docker push <your_docker_hub_username>/<image>:<version>
- Run the container from the image.
Dockerfile
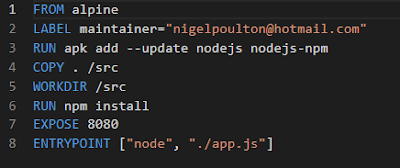
Dockerfile 檔名要完全大小寫一樣,以大寫D開頭,指令不分大小寫,但通常都是用大寫。
此外以下的指令都會建立一個新的 Layer
- FROM
- RUN
- COPY
Containerize the Application
Building images
在提供 Dockerfile 的目錄執行以下指令來build一個新的 docker image 並且設定 tag 叫做 web:latest
shell> docker image build -t web:latest .
Tag the image
以下指令將 image 指定的tag,新增一個 tag
docker image tag <current-tag> <new-tag>
shell> docker image tag web:latest nigelpoulton/web:latest
Pushing images
shell> docker login --username {{username}} --password {{password}}shell> docker image push nigelpoulton/web:latest
shell> docker image push nigelpoulton/web:latest
以上的指令,會是 push 到 Repository 為 nigelpoulton/web 的位置,而 image tag 為 latest
Build from Cache
docker image build 指令的處理過程會使用到 cache 的機制。它在處理 Dockerfile 時候,是根據每一個 layer 去檢查是否已經有存在的 layer 已經在 local cache 可以參考。因此,在撰寫 Dockerfile 時候,要盡量讓變動性大的 layer 放在越後面越好。如果不想要使用 cache 機制,在build docker image 時可以指定 --no-cache=true的參數。
Image history
檢視 image build 的歷史紀錄
shell> docker image history web:latest
Squash the Image
在docker image build 指令加上參數 --squash 可以build出一個壓縮所有的 layers 變成只有一層 layer,因此這種方式是無法共享 layer的。
Docker 常用指令
檢查版本
shell> docker version
啟動docker daemon (MacOSX)
shell> open -a Docker
關閉 docker daemon (MacOSX)
shell> pkill -SIGUP -f /Applications/Docker.app 'docker serve'
啟動docker daemon (Linux without systemd) 並檢查狀態
shell> sudo service docker start
shell> service docker status
啟動 docker daemon (Linux with systemd) 並檢查狀態
shell> sudo systemctl start docker
shell> systemctl is-active docker
docker image
Usage: docker image COMMAND
Manage images
列出 images
shell> docker image list
列出 images 只有 tags 是 latest 的
shell> docker image list --filter=reference="*:latest"
列出 images 用指定的格式輸出
shell> docker image list --format "{{.size}}"
shell> docker image list --format "{{.Repository}}: {{.Tag}}: {{.Size}}"
下載 images
shell> docker image pull ubuntu:latest
Build image (在有Dockerfile的位置執行)
shell> docker image build -t image-name:latest .
Build image 不使用 cache (在有Dockerfile的位置執行)
shell> docker image build --no-cache=true -t image-name:latest .
Build image 不安裝 recommends 的 packages (如果Dockerfile有用到 apt-get install這種方式時)
shell> docker image build --no-install-recommends -t image-name:latest .
從 Docker Hub 搜尋 repository name 指定 official 為 true 的限制 5 筆資料
shell> docker search {repository-name} --filter "is-official=true" --limit 5
從 Docker Hub 搜尋 repository name 指定 automated builds 為 true 的,
shell> docker search {repository-name} --filter "is-automated=true"
刪除特定的 images
shell> docker image rm 02674b9cb179 02675b9cb180
刪除全部的 images
shell> docker image rm $(docker image ls -q) -f
docker container run (等同 docker service create)
Usage: docker container run [OPTIONS] IMAGE [COMMAND] [ARG...]
Run a command in a new container
啟動 container 互動模式, 執行指定的指令直到 /bin/bash 終止
shell> docker container run -it ubuntu:latest /bin/bash
啟動 container 互動模式, 執行 sleep 10 秒, 然後關閉
shell> docker container run -it ubuntu:latest sleep 10
啟動 container 為 daemon模式, 印出 container-id
shell> docker container run -d ubuntu:latest
啟動 container 為 daemon模式, 並且 mount local 的 /Users/username/Desktop/ 目錄為 /desktop 的目錄,在 container 啟動後可以讀寫 /desktop的目錄
shell> docker run -it -v /Users/username/Desktop/:/desktop ubuntu:latest
啟動 container 為 daemon模式, 並且 mount local 的 /Users/username/Desktop/ 目錄為 /desktop 的目錄,在 container 啟動後只能唯讀 /desktop的目錄
shell> docker run -it -v /Users/username/Desktop/:/desktop:ro ubuntu:latest
啟動 container 為 daemon模式, 指定 container name 並且 publish container 8080 port 到 docker host 80 port
shell> docker container run -d --name container-name --publish 8080:80 ubuntu:latest
檢視正在執行的 containers
shell> docker container list
檢視全部的 containers
shell> docker container list -a
進入到 執行的container環境
docker container exec <options> <container-name or container-id> <command/app>
shell> docker container exec -it ubuntu:latest /bin/bash
Attach 到 container
shell> docker attach {container-id}
停止 container
shell> docker stop {container-id or container-name}
刪除 container
shell> docker rm {container-id or container-name}
停止並刪除 container
shell> docker kill {container-id or container-name}
docker logs
用來查找 指定的 application log
shell> docker logs -f {container-id}
docker volume
建立 volume 名稱叫做 app_share_data
shell> docker volume app_share_data
列出 volume
shell> docker volume ls
檢視特定的 volume 資訊
shell> docker volume inspect share_data
docker system
檢視docker 已使用的空間大小
shell> docker system df
TYPE                TOTAL               ACTIVE              SIZE                RECLAIMABLE
Images              36                  6                   12.19GB             11.48GB (94%)
Containers          18                  1                   28.31MB             28.06MB (99%)
Local Volumes       33                  0                   1.818GB             1.818GB (100%)
Build Cache         0                   0                   0B                  0B
而 total reclaimable 顯示有多少空間是可以回收的
回收 docker 所占用的空間
shell> docker system prune
如果要回收特定的空間可以參考
docker container prunedocker images prunedocker network prune
docker network
列出 docker network interface 清單
shell> docker network list
shell> docker network list
$ docker network ls
NETWORK ID          NAME                DRIVER              SCOPE
915fe26ffbc8        bridge              bridge              local
3ac2c0505d62        host                host                local
753c94184c7b        none                null                local
docker 內建支援三種 DRIVER:bridge, host, null,只有 bridge 是能夠設定的。
檢視 docker network interface
shell> docker inspect {network-id}
假設我們看到下面這兩個 container mysql 和 webapp,我們想讓 webapp能夠存取 mysql。這時候,我們需要透過 docker run --link 的指令(--link name:alias)shell> docker run --link "mysql:backenddb" webapp:latest
當它執行成功後,我們可以在 webapp這個 container的 /etc/hosts 檔案中看到一筆 backenddb 的紀錄,它會有一個 docker 配置給 backenddb 的 IP address。
$ docker network ls
NETWORK ID NAME DRIVER SCOPE
915fe26ffbc8 bridge bridge local
3ac2c0505d62 host host local
753c94184c7b none null localdocker 內建支援三種 DRIVER:bridge, host, null,只有 bridge 是能夠設定的。
shell> docker inspect {network-id}
假設我們看到下面這兩個 container mysql 和 webapp,我們想讓 webapp能夠存取 mysql。這時候,我們需要透過 docker run --link 的指令(--link name:alias)
shell> docker run --link "mysql:backenddb" webapp:latest
當它執行成功後,我們可以在 webapp這個 container的 /etc/hosts 檔案中看到一筆 backenddb 的紀錄,它會有一個 docker 配置給 backenddb 的 IP address。
"Containers": {
            "029acceda0674c23a09c7f37b7c3af733cc295f429573e8ef266882d6fc3912a": {
                "Name": "mysql",
                "EndpointID": "f8184cbe809537ec80902323655c6f7ee9fd31940c601252f34fdede1d7201fd",
                "MacAddress": "02:42:ac:11:00:03",
                "IPv4Address": "172.17.0.3/16",
                "IPv6Address": ""
            },
            "57c5fdd375b5e9e5f923fbc289623c3a12995559af501d9cab8be11e788893dc": {
                "Name": "webapp",
                "EndpointID": "af7da2a39e84006db2ecace93602acddaaa16b2e9603a6edf8c4d1a007c80e17",
                "MacAddress": "02:42:ac:11:00:02",
                "IPv4Address": "172.17.0.2/16",
                "IPv6Address": ""
            }
        },
Configure Docker for TLS
ca-key.pem << CA private key
ca.pem << CA public key (cert)
client-cert.pem << client public key (Cert)
client-key.pem << client private key
daemon-cert.pem << daemon public key (cert)
daemon-key.pem << daemon private key
Configuring the Docker daemon for TLS
修改 daemon.json (詳細規格)
MacOSX的 daemon.json 位置 /Users/user_name/.docker/daemon.json
{
"hosts": ["tcp://node3:2376"],
"tls": true,
"tlsverify": true,
"tlscacert": "/home/ubuntu/.docker/ca.pem",
"tlscert": "/home/ubuntu/.docker/cert.pem",
"tlskey": "/home/ubuntu/.docker/key.pem"
}
tlsverifyenables TLS verification. 預設false,使用TLS並做後臺程序與客戶端通訊的驗證tlscacerttells the daemon which CA to trust. 預設 ~/.docker/ca.pem,通過CA認證過的的certificate檔案路徑tlscerttells Docker where the daemon’s certificate is located. 預設 ~/.docker/cert.pem ,TLS的certificate檔案路徑tlskeytells Docker where the daemon’s private key is located. 預設~/.docker/key.pem,TLS的key檔案路徑hoststells Docker which sockets to bind the daemon on.
Warning! Linux systems running
systemd don’t allow you to use the “hosts” option in daemon.json. Instead, you have to specify it in a systemd override file. You may be able to do this with the sudo systemctl edit docker command. This will open a new file called /etc/systemd/system/docker.service.d/override.conf in an editor. Add the following three lines and save the file.[Service]
ExecStart=
ExecStart=/usr/bin/dockerd -H tcp://node3:2376
檢視 指定的 host 的 docker daemon 版本
shell> docker -H tcp://node3:2376 version
Configuring the Docker client for TLS
export DOCKER_HOST=tcp://node3:2376
export DOCKER_TLS_VERIFY=1
export DOCKER_CERT_PATH=位置指向 ca.pem, cert,pem, 和 key.pem的目錄
docker version


沒有留言:
張貼留言
歡迎留言討論與指教